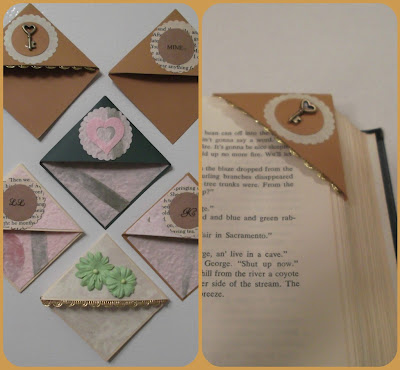
If you’re like a lot of people I know, you grab whatever is handy to mark your page when you’re called away from your book. My usual bookmarks range from those pesky subscription cards that fall out of magazines, to business cards, to paper clips, to bobby pins, to…well, you get the idea. I do actually own real bookmarks, but they’re either being used as real bookmarks, or they have mysteriously disappeared into the depths of the sofa. My sofa eats stuff. Lots of stuff.
I saw a lady at the dentist office with this cute corner marker. I wasn’t being nosy. I just happened to look up when they called her name, and she marked her page with something that looks like one of these.
If I had noticed it before they called her name, I would have given it a thorough inspection, but I only caught a glimpse of her little treasure. So I did what any good crafter would do: I googled it.
I found these at TLC’s How Stuff Works page:
They’re made from envelope corners. Easy peasy. But not exactly what I had in mind. Of course you could glue an envelope corner onto a square of cardstock, but it really looks like you just glued an envelope corner onto a square of cardstock.
Keep looking.
Then I found these at Fireflies and Flutterbyes
Now we’re talkin’! This is perfect!
Her pattern is a little different than mine. I came up with a pattern that doesn’t require cutting away a square after cutting out the pattern. Either method works though.
You can find the template for my bookmarks below. Copy and paste the image into a document. Print it out on cardstock so that it’s durable enough to use over and over. You’re gonna want to make a bunch of these once you get started.
Cut out the pattern as directed on the template.
Trace it onto the paper of your choice, and cut it out. Use sturdy papers for this project. They need to hold up to some wear over time.
Fold the corner flaps as directed on the template and shown in the photos below.
If you want to add another layer of decorative paper to the base square, now is the time to do this. Cut a square slightly smaller than your base. I chose a piece of handmade paper with some stems and leaves embedded in it for this step.
Glue this decorative square to the base of your bookmark. I’m a Tacky Glue girl. Always have been. Always will be. And you really don’t want to break out the glue gun for this project. As we all know, hot glue is not very forgiving, and you may need to make some minor adjustments to align edges after the glue is applied. Just sayin’.
Now it’s time to glue the folded triangular flaps. You may want to see which triangle best covers the other before you go crazy with the glue. In other words, decide which triangle will be on top. Spread some Tacky Glue on the underside of your top flap only.
Hold the bottom flap down, and press the top flap firmly over it.
Make sure all seams and edges are aligned. Your project should now look something like this.
You may choose to say Ta Da! right here, or you may choose to embellish the plain triangle at the top of your little gem. I’m an embellisher. I cut a circle from the same handmade paper with a punch. You don’t need a punch for this. You can trace around any handy round object and use your scissors to get a similar effect.
Then I added a pink heart to the top of the circle.
The possibilities are limited only to your imagination when it comes to decorating these beauties.
This is a project that comes together lickety-split, so go ahead and get out your paper scraps and start creating! Send me some pictures of the ones you’ve made. I’d love to see your creations!


No comments:
Post a Comment